

The Making of a Mermaid
Michelle (mee-shell)
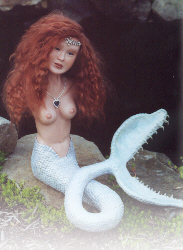
Walk along the water's edge, see with the eye of your imagination and listen with your heart. . . You just may catch a glimpse of a glistening tail or hear the gentle voice of the siren calling to you. . .
The actual sculpting process will be described in more detail as I complete the arms and tail. For information on sculpting hands click HERE. Each body part is formed over a foil "armature" (support system inside the sculpture). The very basic shape is first formed with foil, and then slices of clay are added and formed. My personal preference is Standard Ceramic Supply #213 porcelain clay as it is very soft and takes detail well. Generally, I use photographs and anatomy books for reference; but sometimes I sculpt from my imagination.
The Torso Sculpture in progress
At this point, the sculpting bumps are still quite apparent. The basic sculpture is complete; but some refinements are necessary. It measures 12" from the neck to the crotch. The shoulders are measured with calipers and a ruler; and evened out. The entire torso is further smoothed with a scraper tool and then with cosmetic sponges.
I seal the sculpture with Murphy's Oil Soap while it is still in an upright position and let the excess drip off. Then I proceed to make the clay bed and the plaster mold itself. This is my least favorite part of the process. For information on moldmaking click HERE
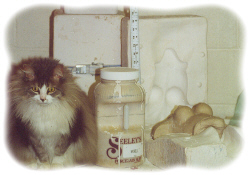
Below is a photo showing the freshly opened mold with the original sculpt inside. The actual claywork sculpture is removed from the mold and discarded at this point. HRH Lady Katrina, Princess of Garrettsville keeps a watchful eye over my work.
 The plaster mold is let to dry naturally for about a week. At that time, it can be poured with porcelain slip. Usually the first pour serves only to clean the inside of the mold and must be discarded. It is also very prone to breaking and cracking. It may require several pours to get a good one.(** Sometimes, you may selvage a pour, fire it and use it as a fitting model to design your costume.)
To pour; the mold is carefully banded shut with straps or heavy rubber bands made especially for this purpose, and liquid slip is slowly and evenly poured into it.(The slip must first be thoroughly stirred, strained and let to sit for a while to let air bubbles escape.) The mold is completely filled with slip and watched. It will start to form a "skin". When this skin reaches approximately 1/4", the mold is slowly drained by holding it a 90 degree angle and pouring the excess slip back into the original container. (The actual pour will be hollow inside.)
The plaster mold draws the excess water from the porcelain slip and it shrinks inside the mold. After about an hour, it will easily release and you can lift the top half of the mold straight up and off. You can make about 3 pours from a mold and then, it must be given a few days to rest and dry out before using it again. Although I generally only make one of each doll, it may be necessary to do several pours due to tearing or breakage. This time, I was lucky and the first pour of the torso came out beautifully.
Once the piece is leather hard, openings such as eyes, neck holes, etc. are cut out. The piece is set aside to let dry for a few days. Force drying with a fan or heat source is not recommended as it causes the outside to dry first and forms a hard crust.

Michelle's Head This is what the dry, partially cleaned "pour" from the slip looks like. It is called "greenware" in its natural state. It is extremely fragile and must be cleaned dry--taking necessary health precations with a respirator. A pour from an original mold requires quite a bit more cleaning than one from a commercial mold.
I prefer to fire the greenware to 018 (1386 degrees F) for added strength and so that it may be wet cleaned. This is referred to as "soft-fired greenware" or "soft-fire". This head only has the eyes partially cut out. They also must be beveled from the inside to accomodate inset eyes. This is the most critical part of the cleaning process, as you need a very narrow rim so the eyes will seat properly into the sockets. The eye area is very prone to breakage and great care must be taken.
Seam lines are removed with a scalpel or clean up tool, and each piece is then sanded with a rubber scrubber, fine cleaned with nylon and then with your fingers. I do the final check under a lighted magnifying glass as any tiny imperfection such as a pinhole or scratch will be clearly visible after the porcelain fire, so perfection is the goal. Here is the cleaned head, propped and ready to be fired in the kiln.
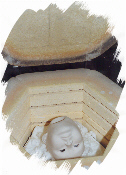
It looks really blase' at this point and you have to use your imagination. This will shrink about 12-15% once it is fired to porcelain.
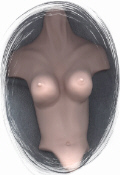
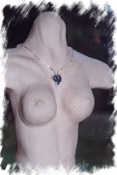
The fired, unpainted torso.
(These scans are slightly distorted, as the fired pieces were placed directly on my scanner and the areas closest to the scanner appear larger.)
A piece like this is very structurally difficult to "porcelain fire" and prone to warping or cracks. The extreme heat required to fire to porcelain causes the piece to reach an almost liquid state and pieces with an overhang (such as the lower part of the torso) are very prone to cracks or distortion.
To achieve the above result, I cleaned the piece--then fired to 05 (1944 degrees F) and let cool completely. Then, I propped the piece by placing blanket prop on the kiln shelf and putting a small amount of bulk prop inside the torso, and as a support around the outside. It was then refired to cone 6 (2291 degrees F). This method has been 100% successful for difficult pieces.
It measures 11 1/2" before firing and 10" afterwards. After the porcelain fire, the piece has been reduced approximately 20% from the original sculpt.
Click for more information on cones and firing temperatures.
Now, this piece must be sanded with a rubber scrubber and cleaned with rubbing alcohol. It will then be China painted multiple times to achieve a lifelike skin tone. Each time, it must be fired to cone 018 and the tones built up in light layers. This is referred to as a "paint firing". I love to china paint as it brings the sculpture to life. Mistakes can be easily removed with a cotton swab and rubbing alcohol prior to firing. Even after a paint firing, if you are really unhappy with the results--it may be refired to cone 6 which will remove the paint and start over.
The final results after 3 paint firings look like this:

It is hard to believe that this face is the same head shown above inside the kiln. The beautiful eyes are by Judith Howe. Next comes hair :)
Click HERE to see more of the construction of Michelle

|